 Wireless Warehouse Picking Orders With Handhelds
| Document Version | v3 |
|---|---|
| Document Last Updated | 5/27/2025 |
| Software Version Documented | v.10 |
Overview
This process document will cover how to handle the picking process using handhelds and the wireless warehouse functionality.
Assumptions
To begin this process, it is assumed that your warehouse has been configured for wireless connectivity, and you have the application installed on our recommended devices. In addition, you have your warehouse locations built, and labeled. Lastly, Wireless Warehouse settings are turned on, and access and security has been configured for any users using the handhelds. .
Within the Handheld App -
Will need to change the default display size from default to small to ensure the menus and details properly fit within the screen.
Admin Settings to Consider
Within the desktop application there are a couple of handheld settings you may want to consider/configure before using the handheld.
-
Go to Admin> Administrator> Warehouses> HH Settings

-
The following settings can and do relate to the Picking Process:

-
Related to Picking Process:
- Items to Pick Order - when configured this will guide the user of the handheld to pick in a particular order based on the best layout or flow for the user. Using the up and down arrows you can select type and move in order how the orders will be picked.
-
Additional Settings to consider:
-
HH Recall Last Template/Printer Selection - When printing an inventory or location labels, if this setting has been selected, your default printer and label templates will automatically be preselected for you.
-
Using Holding Bins - When selected as part of the receiving, shipping and our counting process the handheld workflow will consider that you are using system bins to place items in or out during these processes which will require you to enter or scan these bins before proceeding.
-
-
Options when Picking Orders
Now that you have created your Staging bins, In-transit locations, and Delivery routes with the Savance Application you can now use the handhelds to perform your shipping process.
-
Once logged into the hand-held you will go to Inventory> Shipping. Depending on where you are starting the process you have the following options: Picking or Packing and Delivery.

Picking vs. Quick Pick
When you begin the picking process you have two options once you’ve selected ‘Picking’ from the Shipping Menu. Below describes what the differences are.

Picking
When you select ‘Picking’ the process of choosing orders, either by manually selecting an order or selecting from the picking queue, the main goal is for the user having the ability to go through each step of the picking process and once the order has been completely picked, they can either override and go into the packing stage or let the order automatically go to the packing stage for another user to pack and stage the order.

Quick Pick
When you select ‘Quick Pick’ the process of choosing orders, either by manually selecting an order or selecting from the picking queue, allows the user to quickly pick, pack, and load that order for delivery faster.. As in Pick All and Ship All and post to Loaded.

Picking Orders with the Handheld
-
When you select Picking, you will be prompted with two options, Picking or Quick Pick. I will be selecting Picking.

-
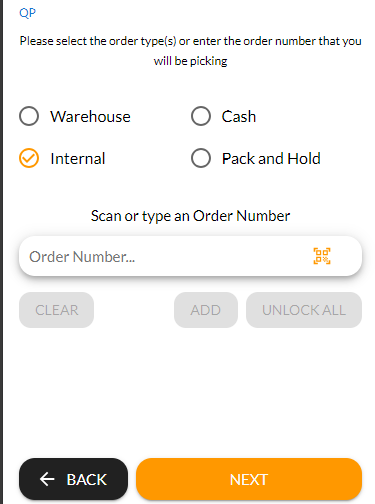
On the next screen, you can select the order type to filter orders to pick, scan or enter the order number in which you will be picking, and select ‘Next’. NOTE: You can assign yourself more than one order to pick, by selecting ‘ADD’ before selecting ‘Next’.
- Enter or scan a PT order to pick or

- Select a filter and select ‘Next’ to choose from the Picking queue
Choosing Orders from the Picking Queue
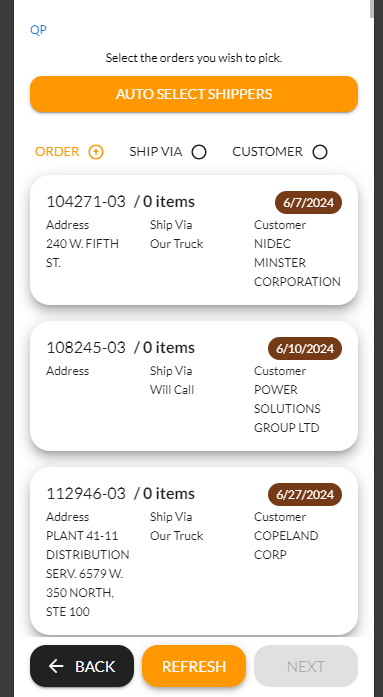
If you have selected to view all shippers ready for picking based on an order type you can select a certain order type or multiple.

-
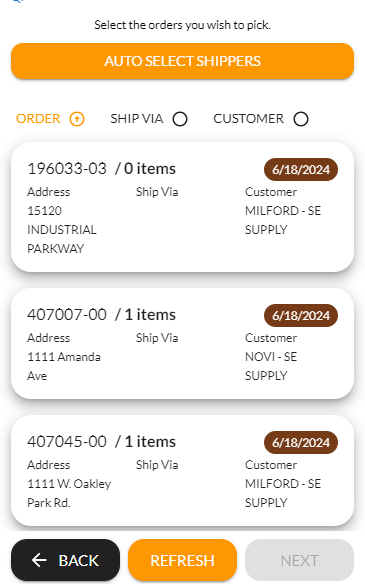
The queue will appear and from here you can use the filters to put the orders in descending or ascending order based on the order number, ship via, or customer’s name by selecting the filters at the top.

-
In addition, you can ‘Auto Select Shippers’ and choose from the list of parameters.

-
Customer Name or All
-
Number of Orders or All
-
Ship Via or All
-
-
Next, select and assign the orders that you are picking by selecting it and then hit ‘Next’.

-
Then scan or enter the shipping holding or moving bin/cart in which you will be placing the picked items in.

-
Next scan or select the item you are picking for this order and select ‘Next’.

-
Then scan or enter the location you are picking the item from.

-
Enter or Edit the quantity you are picking, verify the location, and either Print a Label or select ‘OK’

-
Once that item has been successfully picked it will turn green on your list and you will repeat the process until all items for this order have been picked.

-
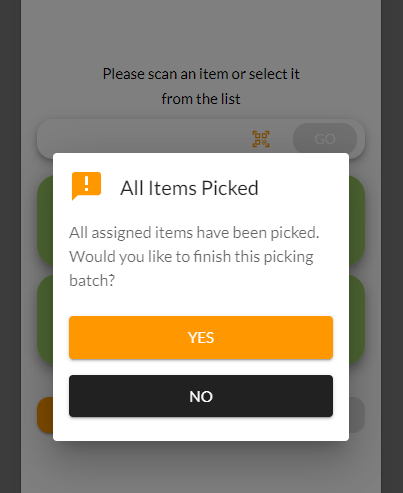
Once all items have been picked you will be prompted with the following:
-
Select ‘Yes’ to finish picking this batch for this order.
-
Once you’ve selected ‘Yes’ you will be asked if you wish to Pack the Material next. If you select ‘Yes’ you will move into the Packing stage to process within the handheld.
-
If you select ‘No’ you will be placed at the beginning of the picking process to select a new order and the order you just finished packing will be placed in the Packing queue.


Using Quick Pick with the Handheld
-
Following the same process in the handheld to get to the Picking process Inventory> Shipping > Picking > Quick Pick.

-
Select the Order Types and or scan and enter the order number that you will be picking. **NOTE: You will know you are in Quick Pick mode as there will be a small QP at the top of the screen.
**

- Enter or scan an order to pick, or
- Using the filters select the order types and select ‘Next’ to choose from the Picking queue
-
Once you’ve selected your orders you will begin the picking process. Scan or select an item from the order and select ‘Next’.

-
The default location for where the items are located will appear. If any items are in a “Held for BackOrders Bin’ it will appear but in blue to let you know this item can be found in multiple locations.

-
Next scan or enter the item’s location in which you are picking from and select ‘Go’.

-
Enter the quantity you are picking, based on the amount to pick, and select ‘OK’. when completed.

-
After you picked all the material, you will next be prompted to choose a delivery method, update the In Transit location, add a tracking number, and print both a packaging list and a driver copy.

-
Once you’ve made your selections and hit ‘Next’, the order will be placed in the “Delivering/Loaded” stage within the system, and your hand-held will go back to the ‘Quick Pick’ screen to start again.


Picking Pack and Hold Orders
In the scenario that you have an order that was flagged at the time of entry as “P&H” (Pack and Hold)
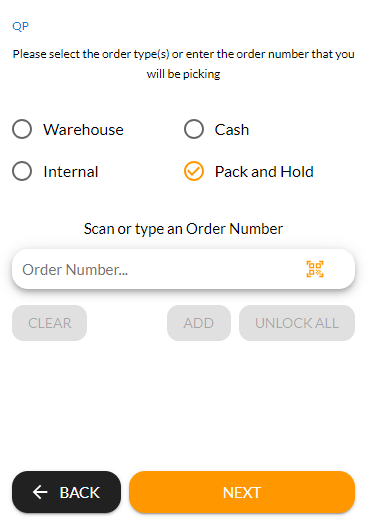
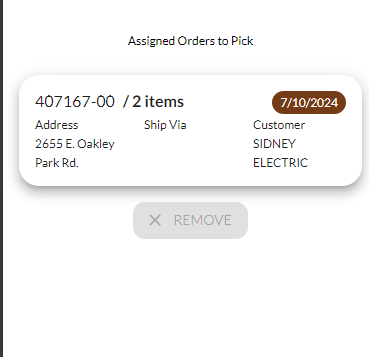
When an order is flagged P&H, it will be marked accordingly, and within the handheld when you select the filter “Pack and Hold” all orders that are flagged will appear in this filter.
-
Then you will select your holding/moving bin
-
Next, you will go through the picking process above.
-
Once you finish picking the items, confirm that you would like to finish the picking batch.

-
The order is then ready for the packing process.
Picking Will Call Orders
In the scenario that you have an order that was flagged at the time of entry as “W/C” (Will Call)
When a Will Call is selected to pick using the handheld, the Ship Via will display “Will Call”.

-
Then you will select your holding/moving bin
-
Next, you will go through the picking process above.
-
Once you finished picking the items, confirm that you would like to finish the picking batch
 .
.
-
The packing/staging process will now take over.
Picking Internal IBT’s
In the scenario that you have an Internal Branch Transfer order created that needs to be picked and shipped.
When an order is flagged Internal, it will be marked accordingly, and within the handheld when you select the filter “Internal” all orders that are flagged will appear in this filter.
-
Then you will select your holding/moving bin
-
Next, you will go through the picking process above.
-
Once you finish picking the items, confirm that you would like to finish the picking batch.
-
The packing/staging process will now take over.
Common Scenarios Encountered while Picking Orders
Picking Less Than Allocated
Sometimes when picking an order you may not be able to fulfill the pick quantity on the order. This will typically happen for two main reasons:
-
You can’t pick the full quantity because there are missing items
-
You choose not to pick the full quantity or at because it doesn’t make sense at the time or it is a large item that you will flag to pick later.
-
Using the HH select an order(s) to pick. Once on the pick screen, enter the quantity that you are picking (less than the quantity to pick) and select ‘Ok’

-
Once you finished picking the material select ‘Done’ to finish the picking batch for this order.

-
You will get the following prompt:

-
Selecting No, will place you back to the picking screen.
-
Selecting Yes, will finish the picking process and move it into the packing stage ( if using the normal picking workflow on the handheld) for this order, and place you back to the main Picking screen to choose another order.

Flagging items to Pick Later
-
Using the HH select an order(s) to pick. On items to pick screen, once you select an item the ‘Pick Later’ button will enable.

-
In the event that you are going to pick an item later you will select this button.
-
The item(s) that you have flagged ‘Pick Later’ will appear in yellow in the picking screen.

-
Finish the picking process until complete.
Picking items from Multiple locations
In the event you have items that are stored in multiple locations in your warehouse this next section will go over this process.
-
Using the HH select an order(s) to pick. Once you have entered your bin information you will be on the warehouse locations page.
-
Any warehouse locations that appear in blue will indicate the item to be picked can be found in multiple locations.

-
If you select the location “...”, an information screen will appear informing you of all locations.

-
Scan or enter or select a location/item in which you will be starting the picking batch and select, Next.
-
Next Scan or enter the location you are picking the item from, and select, Go

-
On the Item page, view the quantity that needs to be picked.
-
View or confirm the amount that you are picking and from the location you are picking it from.
-
Select Ok, to proceed.

NOTE: In the example above, there were only 50 that I could pick from this location. So I have entered this amount and selected ‘Ok’ to proceed.
-
Back on the locations screen I will select the item again, and select, Next.

-
Now on the locations page, I will instead enter/scan the other location where this item can be found in the warehouse, then select ‘Go’

-
On the items page, I will then view the quantity left to pick, enter the amount I am picking and the location in which I am picking from and select Ok to finish the picking process for this item.

Editing a picked quantity
In the event you have NOT finished the picking batch for an order you can edit picked quantities.
During the picking process you can edit previously picked items.
-
Using the HH select an order(s) to pick. Once you have entered your bin information you will be on the warehouse locations page.
-
Any warehouse locations that appear in blue will indicate the item to be picked can be found in multiple locations.

-
Next select the location/item in which you will begin the picking process. You’ll notice a button ‘Edit Previous Picks’

-
When you select this, the next screen will show you any previous picks for this item, and allows you to edit the amount.

-
In the example above, I needed to pick 5 of these items, however I entered the qty of 4 by mistake.
-
I selected Edit Previous Picks and I am now able to edit my quantity.
-
I selected Edit, and my Quantity Picked field is now editable.

-
I entered my new quantity and selected ‘Save’, then ‘Back’ to return to the previous screen.
Alternatively, you can also edit the quantity on the item’s page when entering the quantity to pick.
